At it’s most basic a camera is a light-tight box that holds a thing which captures and renders the light that passes through the opening in the front. The thing can be a photosensitive emulsion as with film and glass plates, or it can be an electronic sensor. We can control the latent image that the light-sensitive thing records through manipulating the Exposure, or amount of light we allow to shine upon the light-sensitive thing.
We do this by adjusting three settings on the camera depending on the available light and the visual effect we want to create: aperture, shutter speed, and ISO. The relationship of these three settings is often explained with what’s known as The Exposure Triangle, and its kind of important because understanding exposure is the foundation upon which all technical mastery in photography is built.
For the purposes of this illustration, assume your camera is set to “Manual” mode.
The Three Sides of the Exposure Triangle

- Aperture
Think of the lens’ aperture as your eye’s pupil. Aperture is a measure of the size of the opening in the lens’ diaphragm, which acts as the iris of the lens and let’s us adjust the size of the aperture opening to let in more or less light. Aperture is measured in units called “f-stops.” The f stands for “focal ratio” and f-stop expresses that ratio calculated as: f/d — the focal length of the lens divided by the diameter of the aperture opening. Each “stop” is twice the preceding value and half the following value. Larger openings (expressed by smaller f-numbers) let in more light while smaller openings (expressed by larger f-numbers) let in less light.
In use the standard progression of these numbers is expressed as “whole stops.” The standard f-stop scale used today is f/1.4, f/2, f/2.8, f/4, f/5.6, f/8, f/11, f/16, f/22, etc. The larger diaphragm opening is on the left in this progression, the smaller ones are on the right.
Note: In practice the term “stop” is used to express a unit of light reaching the film or sensor, and can be adjusted by varying any of the sides of the exposure triangle.
Confused yet? You’ll get used to this terminology quickly, I promise! - Shutter Speed
Shutter speed is the measure of how long your camera’s sensor is exposed to light. It’s expressed in seconds or fractions of a second (i.e., 1/30, 1/60, 1/1000), minutes or hours for long exposures. Just like f-stops, doubling or halving a value represents one “stop” of light. A 60th of a second (1/60) is twice the light of 120th of a second (1/120) and half the light of a 30th of a second (1/30).
Honest to God, this will become second nature with a little practice. - ISO
ISO (International Organization for Standardization) is the international unit that measures how sensitive your camera’s sensor is to light. The range of ISO values is also expressed in, you guessed it, Stops! The progression in whole stops is expressed as a doubling of the previous number. Starting with 50 this would be 50, 100, 200, 400, 800, 1600, etc. Each value is one stop higher than the one before it and half the one following it. Simple, huh?
The Exposure Triangle In Practice
For every photograph we make, there is an exposure value that will result in an evenly exposed image. While you don’t see it today, there is an exposure meter in your camera constantly measuring light values. In the before times we carried a separate instrument called an exposure meter and had to do lots of simple math to figure out the correct exposure. When light was changing fast the math seemed like calculus.
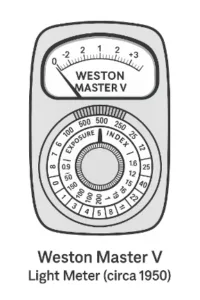
Fortunately modern cameras now do all the math for us!
But letting your camera decide on the proper exposure can lead to unwanted and unexpected results, and we will discuss how adjusting each of the values in the exposure triangle effects the final image and allows us to exercise creative control in detail in a later section. For now, we are only talking about achieving a correct exposure.
Every change to one side of the triangle affects the others.
If you let in more light through a wider aperture, you need a faster shutter speed or lower ISO value to maintain balance and achieve the same exposure value.
If you slow your shutter speed (adding more light), you need to reduce your aperture size or lower your ISO value to avoid overexposure.
If you increase the ISO value you need to lower one or both of the other values to compensate.
But how much do you need to adjust the other values to correctly compensate and get the right exposure? They are all expressed by different numbers that aren’t the same across the three adjustments!
Fortunately, you now know that the language of exposure is expressed in Stops. When you make an adjustment, think of how many stops of light you are adding or subtracting, then compensate with an equal number of stops in one of the other values on the other two points on the exposure triangle, or by adjusting both to match the change in stops of light.
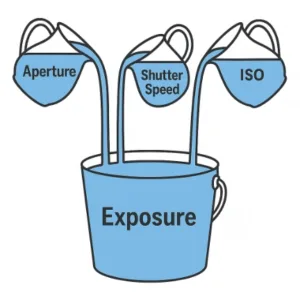
If it helps, think of stops of light as liters of water and exposure as the size of your bucket. You want to fill the bucket and will use water from three small pitchers called Aperture, Shutter Speed and ISO. You’ll have to use water from each of the pitchers to fill the bucket. If you use less from pitcher 1, you need to compensate by using more from pitcher 2 or 3, or by using a combination of the two. The bucket doesn’t know or care where the water comes from to fill it.
In order to achieve a correct exposure you just have to let in the correct amount of light from a combination of values from the three sides on the exposure triangle: aperture, shutter speed, and ISO. Those are the only three variables you need to worry about to achieve a “correct” exposure.
But, as I said previously, adjusting each of these values has a specific, predictable effect on the image you capture. We will discuss what those effects are and their impact on your creative vision in the later sections.
In the meantime I encourage you to practice with your camera on something handy like the cat or a vase. Make an exposure on Auto, note the exposure values for Aperture, Shutter Speed and ISO, then set your camera to manual and using those settings as a starting point make exposures after changing one of the settings by a single stop. Then compensate by adjusting one of the others by a single stop and look at the resulting images. Make several of these adjustments for each setting by adding or removing light with one and compensating with the others. Play like this with your camera often until finding the correct exposure is second nature.
This is easier and better than waiting until you are trying to make a photograph that means a lot to you and trying to figure the exposure out while the subject is moving or the light is changing!